Apart from developing, some
of the other things I do are to create builds for the development team. This
involves picking latest code changes from the source safe, compiling them into
executable form and eventually building it into a distributable package. Of course, before releasing the distributable
I do test it on a clean machine; by clean I mean a machine that has had no
developer or any of the development tools installed. The testing process will involves deploying
on different operating system i.e XP and windows7 including mimicking GPO and
Image deployment.
One of the things I have realised over the time I have
been a Build master, is that this process is very much ignored until the end of
the project. Discussions relating to
extra customizing and shipping usually arise at this time; of course most of
the time it’s usually too late to start purchasing new tools, train on them and
eventually use them.
This leaves us with a problem on how you can make do with
the limited tools and time to customize an installation if such a scenario
arises.
Visual studio is one of the kits almost every developer
has installed in their machines, it comes with a project setup tool that can be
used to do quick and easy install though it is limited in scope. The main
drawbacks include:
- Having a limited number of dialogs to choose from, which can easily run out on a relatively simple install, example, say that you have a need for a further set of textboxes for a piece of information that contextually belongs on its own and does not look correct if tagged onto one of the other dialogs.
- The information you can enter is limited. Have you ever needed a dialog with 5 radio buttons? What about a pick-list of options?
- Build Automation; e.g. you cannot put your project and the VS Setup Project on a build machine and have them built automatically.
- There is no way to designate a custom action to run with elevated privileges
Just to mention a few…
Developing
a setup:
In this post I’ll show you how to create a custom action
and to use it in a setup deployment project using C# and Visual Studio 2010. For
our sample, we will have windows form application and a deployment project
which is ready to build an MSI that will deploy the windows form project to
program files.
To start will we will add an extra dialog in our setup
then include a custom action to edit the Application Config file (*.exe.config
) with the data collected from the textbox in the dialog during installation.
Here is what my solution looks like:
I have added an Installer class to my Form
Project. Do this by right clicking on the solution>Select Add> select
Class. From the Add New Item dialogbox select Installer Class.
Here is my app.config file
<?xml version="1.0" encoding="utf-8" ?>
<configuration>
<appSettings>
<add key="ConnectionString" value="" />
</appSettings>
</configuration>
I want to edit the value of the’ ConnectionString’ key
during installation.
Steps:
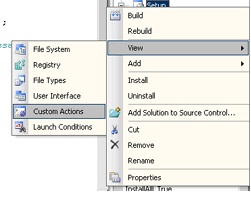
- Right click the Custom actions view and add a Primary project output under the install custom

2. Select the primary output and edit the ‘CustomActionData’ . This will allow us to get data from the command line to the installer’s InstallContext property.
3. Add a dialog to the setup by opening the user
Interface view
Please note that I have added a License
Agreement dialog and Testboxes(A) Dialog. On the TextBoxes(A) dialog properties set all the
Edit properties to invisible except Edit1 which you will rename to SERVENAME.
4. Add an InstallerCustomAction class to the window form project and add the
code below
[RunInstaller(true)]
public partial class Installer1 : System.Configuration.Install.Installer
{
public
Installer1()
{
InitializeComponent();
}
[System.Security.Permissions.SecurityPermission(System.Security.Permissions.SecurityAction.Demand)]
public override void
Install(IDictionary savedState)
{
base.Install(savedState);
}
[System.Security.Permissions.SecurityPermission(System.Security.Permissions.SecurityAction.Demand)]
public override void
Uninstall(IDictionary savedState)
{
base.Uninstall(savedState);
}
[System.Security.Permissions.SecurityPermission(System.Security.Permissions.SecurityAction.Demand)]
public override void
Rollback(IDictionary savedState)
{
base.Rollback(savedState);
}
[System.Security.Permissions.SecurityPermission(System.Security.Permissions.SecurityAction.Demand)]
public override void Commit(IDictionary savedState)
{
string
ServerName;
if
(savedState.Contains("ServerName")
== true)
{
ServerName = savedState["ServerName"].ToString();
if
(ServerName.Length > 0)
{
EditConfigFile(ServerName);
}
}
base.Commit(savedState);
}
[System.Security.Permissions.SecurityPermission(System.Security.Permissions.SecurityAction.Demand)]
private
void EditConfigFile(string
ServerName)
{
try
{
string
Split1 = "Data Source=";
string
Split2 = ";Initial
Catalog=MYDATABASE;Integrated Security=True";
//get
the configuration setting
System.Configuration.Configuration config = ConfigurationManager.OpenExeConfiguration(ConfigurationUserLevel.None);
//from
the appSettings remove the original Connectiostring
config.AppSettings.Settings.Remove("ConnectionString");
// add
new connectionstring
config.AppSettings.Settings.Add("ConnectionString",
Split1 + ServerName + Split2);
//Save
changes
config.Save(ConfigurationSaveMode.Modified);
ConfigurationManager.RefreshSection(config.AppSettings.SectionInformation.Name);
}
catch
(Exception)
{
}
}
}
Lastly Build you application and the setup too then test deploy.To test the command line use the command: msiexec /i setup1.msi
/qb ServerName=”Myserver”


No comments:
Post a Comment
Comment